It's well-documented that I will find just about any excuse to craft. My latest adventure comes courtesy of Mr. Goodlaff's sister, who brought a beautiful baby girl into the world this week, making me a very proud aunt on a crafty mission. Eventually I will make Baby H a baby blanket, but these things take time, and I wanted her to have a little something to tide her over until I can finish it.
Looking for a quick, easy-ish project, I consulted One Yard Wonders, a book filled with great projects needing one yard of fabric or less. After much back and forth with Mr. Goodlaff, we decided that Elodie the Elephant was the best choice. We chose fabric from among my stash and I got to work. I cut, I sewed, and I stuffed. I pinned her ears in place and was about ready to sew her shut when I stopped and took a second to admire my so-called handiwork.
And it was bad.

Showing posts with label DIY. Show all posts
Showing posts with label DIY. Show all posts
Sunday, July 31, 2011

Tuesday, June 28, 2011
Shoe Transformation Inspiration
If you remember, I finally decided to have my bridesmaids wear silver shoes on wedding day. I called Sister Goodlaff a few weeks before the wedding, and she still hadn't gotten her silver shoes, so a few days before W-day (being the nosy big-sister that I am), I asked her to show me her shoes.
Here's what she brought out:


Here's what she brought out:


I thought they were super cute, but didn't remember seeing these shoes in silver during any of my wanderings at Payless Shoesource. That's because, once upon a time, Sister Goodlaff's shoes looked like this:
Thursday, April 28, 2011
Minion Craft Nite III
A week ago Tuesday was our third and final Minion Craft Nite, and as usual, my minions (Mama Goodlaff, The Enforcer, and BM TCollins) were incredibly productive. We knocked out the final stages of a few projects.
Remember the pinwheel escort cards? They have stems and guest names now!

Remember the pinwheel escort cards? They have stems and guest names now!

Monday, April 25, 2011
All the little details
Details, Details. This last week is all about the details. Our to-do list is long and each item crossed off brings a huge sigh of relief. Here are just a few of the little things I've been working on:
Dee's Flower Girl basket:


Dee's Flower Girl basket:


Zee's Ring Bearer pillow:
Friday, April 15, 2011
Minion Craft Nite II
You would think after the glue and tissue paper torture I put them through last week, my minions would have stayed far away from Casa Goodlaff, but not so! Mama Goodlaff and BM TCollins came back for more wedding craft fun, and what's more, Mama Goodlaff wrangled up one more set of hands! The newest member to the Goodlaff Craft Support League is The Enforcer.

The Enforcer is Mama Goodlaff's good friend and co-worker (and one of the sweetest, most thoughtful people you will ever meet), and has agreed to be our Day-Of Coordinator, which is beyond awesome! She will keep us all in line and on time, and if any of our guests decide to cause drama (completely possible given the situations with some of our family members), she will nicely tell them to cease and desist, and if they won't behave, she will have the happy task of removing them. Having The Enforcer in charge will mean that Mama Goodlaff and I won't be completely crazy with details on the day of the wedding...maybe.
So there we were, four little crafters all in a row. The day's agenda included pinwheel creation and Kabuki Streamer construction, and after I cracked the (crepe paper) whip, the ladies knocked it out!


The Enforcer is Mama Goodlaff's good friend and co-worker (and one of the sweetest, most thoughtful people you will ever meet), and has agreed to be our Day-Of Coordinator, which is beyond awesome! She will keep us all in line and on time, and if any of our guests decide to cause drama (completely possible given the situations with some of our family members), she will nicely tell them to cease and desist, and if they won't behave, she will have the happy task of removing them. Having The Enforcer in charge will mean that Mama Goodlaff and I won't be completely crazy with details on the day of the wedding...maybe.
So there we were, four little crafters all in a row. The day's agenda included pinwheel creation and Kabuki Streamer construction, and after I cracked the (crepe paper) whip, the ladies knocked it out!

Yeah, they look terrified, don't they?
Monday, April 11, 2011
Getting Crafty With a Little Help From My Friends...
At this point in the planning process, it's becoming less about planning and more about doing. My ideas are now having to come to life and projects I've put off for a long time can't be put off any longer. Case in point: the yellow votives for our tables.

Months and months ago I searched high and low for yellow votive candle holders. Did I find them? No. I looked everywhere. I found amber glass votives, and white glass votives with yellow candles. To be fair, I did find the votive holders I wanted, but they were in Australia. The cost, coupled with the shipping, was just too much.
No biggie, I thought, I will make the candles I want.


Months and months ago I searched high and low for yellow votive candle holders. Did I find them? No. I looked everywhere. I found amber glass votives, and white glass votives with yellow candles. To be fair, I did find the votive holders I wanted, but they were in Australia. The cost, coupled with the shipping, was just too much.
No biggie, I thought, I will make the candles I want.

In order of appearance: candle #1 is what I wanted the votives to look like (nice and bright, but frosted for a soft glow); 2 is half acrylic paint (disaster), half yellow glass paint (streaky); 3 is frosted, then painted with yellow glass paint (not frosted enough); 4 is layers of torn tissue paper; 5 is a single layer of tissue paper; 6 is one company's definition of a "yellow" glass votive. And yes, that is our Wii Fit Balance Board serving as a modeling platform--as you can see, it gets used a lot.
Thursday, April 7, 2011
The Cockatoo Veil
A while ago I decided to make my own veil. I bought all the fixin's, looked at inspiration photos, picked a design, found a tutorial. ThenI did nothing for several months. It's not that I was afraid to tackle the project, I just figured it would be so easy that it didn't require a lot of my time or immediate attention. Heh.
The day before my bridal shower, I sat down to knock out this supposedly easy project. Using this tutorial from Project Wedding I sewed my veiling to combs, popped it on my head, and....


We're twins!
Ugh. I looked like a cockatoo. Instead of gently molding to my head, the veil stuck straight up in the air, making it look not so much like a veil, but more like a windshield.
Needless to say, I was displeased.
The day before my bridal shower, I sat down to knock out this supposedly easy project. Using this tutorial from Project Wedding I sewed my veiling to combs, popped it on my head, and....


We're twins!
Ugh. I looked like a cockatoo. Instead of gently molding to my head, the veil stuck straight up in the air, making it look not so much like a veil, but more like a windshield.
Needless to say, I was displeased.
Tuesday, April 5, 2011
It's Hip to Be Square: Goodlaff Invitation Production
Welcome to your behind-the-scenes tour of Goodlaff Invitation Production!
I used Adobe PhotoShop to do the design work for all of our paper products, including our Save-the-Dates and our invitations. Apparently, PhotoShop is mostly for editing pictures and not really meant as an invitation design suite--something about lines versus pixels (No worries, I don't get it either...). Still, PhotoShop was the tool I had, so it was the tool I used. And I have to say, our invitations came out lovely!
After the Goodlaffs chose a shape, it was time to work on the design. In perusing invitation designs, both Mr. Goodlaff and I wanted a card that conveyed the type of wedding we were going for (fun, classy, fresh), without being too stuffy. I knew I wanted to keep the invites in the same theme as our Save the Dates, so the easiest thing was to carry over the fonts and colors that we used on our postcards and incorporate them into the new product. I ended up using Jane Austen, Swinging, and Nymphette, all from dafont.com, plus Daun Pehn for the print portions, and we sent all the files to our local Auburn Printers to get them printed.
Can I just take a moment to say how incredibly awesome it is to have a printer that will work with you? We ended up having a total of four printed pieces: the 5.75" by 5.75" card with the invitation itself; the 1.5" by 1.5" monogram for the front; the RSVP postcard; and the 4" by 4" information/directions card. Auburn Printers was able to cut all of our pieces to size, which easily saved us a day's worth of work (at least).

I used Adobe PhotoShop to do the design work for all of our paper products, including our Save-the-Dates and our invitations. Apparently, PhotoShop is mostly for editing pictures and not really meant as an invitation design suite--something about lines versus pixels (No worries, I don't get it either...). Still, PhotoShop was the tool I had, so it was the tool I used. And I have to say, our invitations came out lovely!
After the Goodlaffs chose a shape, it was time to work on the design. In perusing invitation designs, both Mr. Goodlaff and I wanted a card that conveyed the type of wedding we were going for (fun, classy, fresh), without being too stuffy. I knew I wanted to keep the invites in the same theme as our Save the Dates, so the easiest thing was to carry over the fonts and colors that we used on our postcards and incorporate them into the new product. I ended up using Jane Austen, Swinging, and Nymphette, all from dafont.com, plus Daun Pehn for the print portions, and we sent all the files to our local Auburn Printers to get them printed.
Can I just take a moment to say how incredibly awesome it is to have a printer that will work with you? We ended up having a total of four printed pieces: the 5.75" by 5.75" card with the invitation itself; the 1.5" by 1.5" monogram for the front; the RSVP postcard; and the 4" by 4" information/directions card. Auburn Printers was able to cut all of our pieces to size, which easily saved us a day's worth of work (at least).

Assembly began one Saturday morning/afternoon, with much fanfare, and ended with one of us sustaining a few injuries.
Tuesday, March 29, 2011
A Cameo Appearance
Perhaps you remember my gigantic Cameo conundrum?

The first necklace I bought was way too big, and though I wasn't sure that lightning could strike twice, I knew I wasn't ready to give up on the cameo idea. I had to try again. Back to Etsy I went, still in search of a blue cameo that wasn't the size of Lake Michigan. And what do you know? I found one! A set of six blue cameos for $2.95, and two cameo settings for another $2.00, and I was back in business.
See? Much, much better:
Monday, March 21, 2011
How My Hair Flower Garden Does Grow...
Last Friday was a red letter day in the productivity department at Chez Goodlaff. I managed to, within the space of three hours, craft a new hair flower, make a rough draft of my veil, and finish my wedding day necklace. I was like the Energizer Bunny of wedding crafts--and I liked it!
I have so, so much to share with you, but one thing at a time, eh?
If you've been paying attention, you're probably asking yourself, "Miss Goodlaff has made yet another hair flower? When will it end?"
Right now, my friends, right now. See, I've finally got it right.


I have so, so much to share with you, but one thing at a time, eh?
If you've been paying attention, you're probably asking yourself, "Miss Goodlaff has made yet another hair flower? When will it end?"
Right now, my friends, right now. See, I've finally got it right.
After finishing several of the chiffon hair flowers, first in blue, then in white, I still wasn't completely sold on the look. The edges of my chiffon flowers frayed and made the overall look messy, instead of light and fluffy.
I found myself looking at flowers like these:

Wednesday, March 16, 2011
It's Hip to Be Square: Goodlaff Invitation Reveal
Hopefully by now most, if not all of our guests have received their invitations (and should be sending in their RSVP's--yes, I'm looking at you), so it's finally time for the big reveal! Behold, the Goodlaff invitations:


Tuesday, March 15, 2011
A Time Out for Tutus
Mr. Goodlaff's niece, (and our flower girl) Dee, turned three last Tuesday, and having recently discovered her inner princess, I knew that what a three year-old princess needs most on her birthday is a tutu--that's right, a big, fluffy, girly tutu.
Dee is a tiny little thing, and being not too familiar with sewing children's clothes (or any clothes for that matter), I had a heck of a time figuring out how big to make the tutu. My first draft came out okay, and used elastic, but it really lacked the finished quality I was looking for. I started off using this tutorial for a no sew tutu, where you tie strips of tulle directly on to the elastic, then I put a satin ribbon on to finish the waistband:


Dee is a tiny little thing, and being not too familiar with sewing children's clothes (or any clothes for that matter), I had a heck of a time figuring out how big to make the tutu. My first draft came out okay, and used elastic, but it really lacked the finished quality I was looking for. I started off using this tutorial for a no sew tutu, where you tie strips of tulle directly on to the elastic, then I put a satin ribbon on to finish the waistband:

In the middle of the tying process...

All done!
It was an okay attempt, but I really wanted a more professional looking result, so I ripped it all apart and decided to forge my own tutu, sans tutorial.
Monday, March 14, 2011
Time to Accessorize
My wedding dress came a few months ago, and when Mama Goodlaff and I were playing dress up, we both realized something: I would need one hell of a statement necklace to go with my gown. As I looked around at necklaces, I found myself drawn, time after time, to the same design:

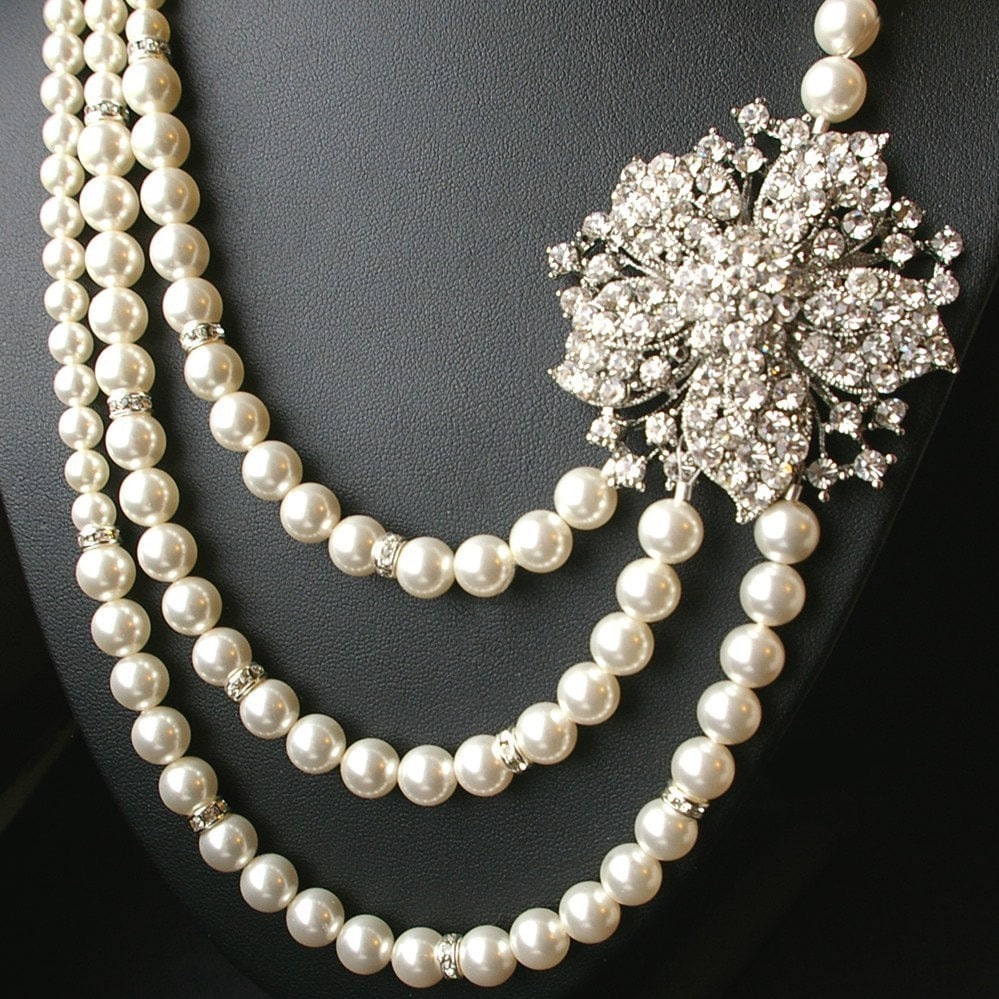
But these necklaces were a little too classic, a little too chic, and a little too, well, white. I knew I wanted a bit of color, so I went looking for another "something blue" to match my shoes. And what did I find?
Wednesday, March 2, 2011
Just Tossing Money Away: A Tutorial
I will start by saying that I'm sure there are about a dozen better/easier ways to do this project; I considered at least seven different construction techniques before settling on this one, which may or may not have been correct. You might look at this and think to yourself, "Why on earth does Miss Goodlaff insist on doing things the hard way?" Answer: that's just how I roll.
Okay. So. After I made my flowers, I needed to assemble them into a bouquet. Here's what I used:

Our local craft store, much as I love it, is sometimes lacking in selection, so I made do with a Styrofoam cone and half-dome, ribbon in our wedding colors, and some greenery and small white flowers to add a bit of interest and filler to the bouquet. I also used the stems from gerbera daisy flowers (used to make my spring wreath), cut into six-inch lengths. A bit of florist's tape, a hot glue gun, and the stem from the greenery for core support rounded out my supply list.
First, I arranged the flowers on the Styrofoam half-dome.

I took the Styrofoam cone and shaved it down until I had a one inch wide, six inch long cylinder. As a side note, Styrofoam shavings go everywhere--if you do it this way, lay down a mat or something (I wish I had, because the Goodlaffs desperately need to vacuum now...). At some point I decided that gluing Styrofoam to more Styrofoam would be a little less than sturdy, so I took the wiry part of the greenery stem, and poked it through the center of the base, leaving just enough to go into the Styrofoam half dome holding the origami flowers. Like so:
Okay. So. After I made my flowers, I needed to assemble them into a bouquet. Here's what I used:

Our local craft store, much as I love it, is sometimes lacking in selection, so I made do with a Styrofoam cone and half-dome, ribbon in our wedding colors, and some greenery and small white flowers to add a bit of interest and filler to the bouquet. I also used the stems from gerbera daisy flowers (used to make my spring wreath), cut into six-inch lengths. A bit of florist's tape, a hot glue gun, and the stem from the greenery for core support rounded out my supply list.
First, I arranged the flowers on the Styrofoam half-dome.

I took the Styrofoam cone and shaved it down until I had a one inch wide, six inch long cylinder. As a side note, Styrofoam shavings go everywhere--if you do it this way, lay down a mat or something (I wish I had, because the Goodlaffs desperately need to vacuum now...). At some point I decided that gluing Styrofoam to more Styrofoam would be a little less than sturdy, so I took the wiry part of the greenery stem, and poked it through the center of the base, leaving just enough to go into the Styrofoam half dome holding the origami flowers. Like so:
Tuesday, March 1, 2011
Just Tossing Money Away
A few weeks ago I stopped by my bank and asked the girl behind the counter for thirty brand-new one dollar bills. After she figured out that I wasn't actually kidding, she told me that they didn't have any, but offered to go through all the money in her drawer and pull out thirty bills in the best shape that she could find. Now, I know that I've made cracks about living in a small town, and I can tell you, it's not always fun residing in the middle of nowhere. That said, sometimes living in a small town rocks--like when you ask the bank teller for new bills and she takes the time to sort through hundreds and hundreds of dollars just to get you thirty crisp, fresh(ish) bills.

I'm not usually that particular about my money (in fact, I rarely ever carry cash), but in this case, I needed the nicest bills I could find, because I was going to do a little bit of money origami in order to make the flowers for my toss bouquet. You may remember that Mr. Goodlaff and I are foregoing the typical bouquet toss in favor of a more inclusive, money bouquet toss, and since money flowers don't grow on trees, it was time to get folding.

First things first: I did a little research to find online origami money flower tutorials and came up with three candidates:
Monday, February 28, 2011
Changing of the Guard
Despite the fact that our porch recently looked like this:

I've decided that it's time for Spring to come to the Goodlaff household, which means a changing of the guard on our front door. Yesterday, guests would have been greeted with a gigantic pile of ice and snow and this lovely, wintry wreath:


Today, visitors to the Goodlaff residence will instead be greeted with this:
Tuesday, February 22, 2011
Casualty of the Wedding DIY War
Mr. Goodlaff and I spent the long weekend assembling our wedding invitations. Here's how the process began...

No, we weren't pretending to be thugs, we were preparing to meet the dreaded adhesive spray glue in the battle for the perfect DIY invitations. The glue is miraculously effective, but it's messy, and, as you can tell from our improvised face masks, smelly. Having never used adhesive spray for crafting, it was a bit of a risk using it to assemble our invites, but after a few minutes, we were old hats at it.
Monday, February 21, 2011
Topping it Off
What, you may ask, would I be doing with something like this?:


Making it into a fancy hat for my bridal shower in a few weeks, that's what!
MOH Sister Goodlaff (with cooperation and premises provided by Mama Goodlaff) is throwing me a bridal shower in March, and I've been marginally involved in the preparations. The theme for the shower is an Alice in Wonderland-style vintage tea party (without the acid trip). Mama and Sister Goodlaff have been busy gathering vintage tea cups from secondhand stores, planning table layouts, getting decor, and designing invitations in hopes of creating the perfect eclectic, classy tea party-themed bridal shower. And everyone knows that a classy tea party would not be a classy tea party without a fancy hat!

Shower-goers are being given the option of wearing a party hat to celebrate the theme and the festivities; Mama Goodlaff has been picking up some hats at second-hand stores, and is even going to rent a few for unprepared guests. There's no way I was going to miss out on the fun! However, the white hat with the gigantic pink flower (a Mama Goodlaff bargain find) was not going to cut it--my hat needed a bridal makeover...
Thursday, February 17, 2011
Merging: Not Just for Highways
*Before I start, let me say that I'm using Office 2007. The mail merge function looks different in previous versions of Word, but you should be able to find all the same tools that I use here. All pictures are screen shots or personal photos.
First things first: you need to get all of your guest addressing information into a spreadsheet or database. I used Microsoft Excel, and created data columns for Guest Name, Street Address, City, State, and Zip Code. You can break it down however you want, but this was the easiest format for me to deal with.


First things first: you need to get all of your guest addressing information into a spreadsheet or database. I used Microsoft Excel, and created data columns for Guest Name, Street Address, City, State, and Zip Code. You can break it down however you want, but this was the easiest format for me to deal with.

Before you even open Word and start merging, you need to decide which labels you want to use. There are so many different sizes, and if you're using Avery labels, MS Word comes with templates. You just pick the template number associated with the labels you're using, and you're in business--someone has already done the hard part. In my case, we're using two label types (both are clear labels): for the invitees' addresses we're using Avery template 5164 (3.33" x 4"), and for our return address on the back of the envelope, we're using Avery template 5160 (1" x 2.63"). Labels come in all shapes and sizes, and even if you choose to use off-brand labels, the Avery template number is usually printed on the box somewhere.
So, you've chosen a label type. Excellent. Open MS Word. Go to your "Mailings" tab and click on "Start Mail Merge." Select Labels.

Pick a template, any template. No--pick the one you need. (make sure to double check the label information on the right to see that it's correct).
Tuesday, February 15, 2011
Don't Label Me!
Oh dear, I'm afraid that we're about to break some rules. Mr. Goodlaff and I are going to do the unthinkable: we're going to address our invitations using labels.
Say it ain't so!
Apparently, this is a huge breach of etiquette. Even though using labels to address invitations is becoming more common, it seems that people still feel strongly about it (the Weddingbee boards are full of people on both sides of the issue). Am I really supposed to hand-address each one of these envelopes? I get it--it's a personal touch. But I don't have consistently neat handwriting; I don't know how to do calligraphy. I also happen to like my cramp-free hand.
We could send them out to a calligrapher. But what's the difference between me putting a label on versus paying someone else to write them all out? That personal touch of me addressing the envelope is gone either way. One way just costs more. Our way is cheaper and easier (To be fair, I have to think of it this way. Our budget has no room for a calligrapher, even if we wanted one!).
Allow me to introduce you to our fancy printed labels courtesy of Microsoft Word's magical Mail Merge function:

Say it ain't so!
Apparently, this is a huge breach of etiquette. Even though using labels to address invitations is becoming more common, it seems that people still feel strongly about it (the Weddingbee boards are full of people on both sides of the issue). Am I really supposed to hand-address each one of these envelopes? I get it--it's a personal touch. But I don't have consistently neat handwriting; I don't know how to do calligraphy. I also happen to like my cramp-free hand.
We could send them out to a calligrapher. But what's the difference between me putting a label on versus paying someone else to write them all out? That personal touch of me addressing the envelope is gone either way. One way just costs more. Our way is cheaper and easier (To be fair, I have to think of it this way. Our budget has no room for a calligrapher, even if we wanted one!).
Allow me to introduce you to our fancy printed labels courtesy of Microsoft Word's magical Mail Merge function:

Mail Merge, I heart you!
Subscribe to:
Posts (Atom)