First things first: you need to get all of your guest addressing information into a spreadsheet or database. I used Microsoft Excel, and created data columns for Guest Name, Street Address, City, State, and Zip Code. You can break it down however you want, but this was the easiest format for me to deal with.
Before you even open Word and start merging, you need to decide which labels you want to use. There are so many different sizes, and if you're using Avery labels, MS Word comes with templates. You just pick the template number associated with the labels you're using, and you're in business--someone has already done the hard part. In my case, we're using two label types (both are clear labels): for the invitees' addresses we're using Avery template 5164 (3.33" x 4"), and for our return address on the back of the envelope, we're using Avery template 5160 (1" x 2.63"). Labels come in all shapes and sizes, and even if you choose to use off-brand labels, the Avery template number is usually printed on the box somewhere.
So, you've chosen a label type. Excellent. Open MS Word. Go to your "Mailings" tab and click on "Start Mail Merge." Select Labels.
Pick a template, any template. No--pick the one you need. (make sure to double check the label information on the right to see that it's correct).
Once you've made your selection, click "OK."
Now it's time to get your data associated with your labels. In the "Mailings" tab, click on "Select Recipients," then "Use Existing List."
Find your guest address list wherever it's located on your computer, and "Open."
Word is going to ask you to "Select Table" so it knows where to find your data. Unless you have a monster spreadsheet with data on multiple sheets, chances are that your data is on Sheet 1. Click "OK."
Easy, peasy. Now you're ready to start designing your labels.
Labels can be fancy or super simple. Mine are on the fancier side, so keep in mind that if you just want addresses on a label, some of these steps are not necessary.
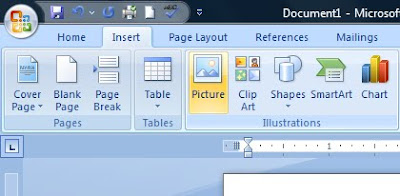
I wanted to add a picture to my labels to get them all gussied up. I used this freeware frame, and with PhotoShop, flipped it on its side, colored the lines so they'd be blue to match our color scheme, and changed the size so it would fit in the label template. I saved the file as a jpeg. To add a picture, go to the "Insert" tab and click on "Picture." Locate your picture on your computer and select "Insert."
Your picture should populate into the first label box. If you need to reposition the picture, do it now. It's difficult to do later. Once your picture is in the right place, right click on the picture and select the "Text Wrapping" option, then select "Behind Text," as this will allow you to type on top of the picture (in my case, in the middle of the frame).
To get your picture into every label, click on "Update Label" in the "Mailings" tab, and Word will make the updates on every label. Remember this--you'll use it again later.
Now we're ready to get our addresses on there. In the "Mailings" tab, select "Insert Merge Field," and a drop down of all your data fields will show up.
Click on the fields you want to add. Make sure you include line breaks and spaces where appropriate--Word won't do that for you. Arrange your data where you want it (I centered mine), then update your labels again. You should now see all of your labels populated with the names of your data fields (see below). Don't freak out about <<NextRecord>>. It's supposed to be there. Don't remove it, or your merge won't work. Trust me. It won't show up on the labels. I promise.
Want to see how it will look when your data is actually in there? Click on "Preview Results."
When you push this button, Word pulls the first few lines of data from your spreadsheet so you can see how your labels will really look. If they look good, it's time to finish the merge. If not--go back and fix it. I highly recommend previewing your labels--I have saved many trees this way.
Feeling good? Ready to be done? Almost there. Select the "Finish & Merge" button, and you will see that you have a few options. You can print right away, or you can "Edit Individual Documents." I recommend that you choose the "edit" option, because you will see all of your labels before they print.
Why edit? Check it out:
Oh dear, my text is too large on this one label. When you select "Edit Individual Documents," you have a chance to fix the mistakes before they print. If you print right off the bat, not so much. In this case, I just adjusted the font size down a bit and all was well.
Once you're done checking things over and making your edits, go ahead and print your labels!
Done.
Here's how mine came out:
And on the envelope:
The clear labels really looked great, but they were missing something...
Personality, maybe? A little color did the trick, and we have ourselves some labels. Also, make sure you put the paper in the printer properly, unlike me (good thing it was just a test...).
Cost for this little project?
The clear Avery labels were $11.99 for 60 at Staples, and the smaller return address labels were the same price for 300 labels. All told: $36 plus tax for our supplies--totally worth it and totally awesome!
Good luck!


No comments:
Post a Comment